food isn't any good unless you have some fun!

come on in and enjoy!
Showing posts with label vegetables. Show all posts

Monday, October 5, 2015

Creamed Spinach

Hey everyone!

We recently had a dearth of spinach, and I asked my fiancé whether he had ever had creamed spinach. Not having grown up in the south, he said no, but I encouraged him to make it and now he's made it almost 5 times. It's a fairly standard side in the south, and put those onions and bacon in it, and you're golden!

My fiancé just went off of this recipe here by Paula Deen on the Food Network website, but he then added some crispy bacon and has since modified it to frying the bacon first, then using some of the bacon fat for the onions, etc. Try either way- just depends how much you love bacon!

Here's your spinach after most of your pretty quick steps- just let it wilt down a bit and meanwhile...
If you didn't start by frying the bacon then using the grease for the onions, do that, but if you've got a vegetarian or something like that, just fry your bacon to serve on top.

This is super simple, and a great and delish way to get some greens- try it!
Savor it!
love, rue

Monday, April 20, 2015

Jalapeño Poppers

Hey everyone, this post is written by me, but all the work was done by the BF, so all credit to him for the idea and execution, start to finish!

So we were at the store and saw some frozen jalapeño poppers, but figured they were awfully expensive, so why not make his own? We already had cream cheese for stuffing, so we bought some jalapeños and bread for crumbs and below is the result!

Most of your ingredients- simple!
Your halved jalapeños and homemade breadcrumbs.
The stuffed jalapeños!
And here's your dredging setup, post-chilling.


Jalapeño Poppers
-jalapeños
-cream cheese, flavored, mixed, or otherwise, for filling
-breadcrumbs or bread for breadcrumbs (toast, then pulse in food processor)
-flour
-egg
-oil
Halve the jalapeños and de-seed and de-vein to your preference.
Fill with your choice of cream cheese based filling. Chill.
Put egg in one bowl, well beaten, flour in a second bowl, and bread crumbs in a third.
Dredge the stuffed jalapeños in egg, flour, egg, and breadcrumbs.
Heat your skillet over medium heat. Place your jalapeños, however many will fit without crowding at a time, in the pan and fry until browned nicely.
Place jalapeños on a baking sheet and bake at 350 F for 5-7 minutes.
Serve with jam or your choice of sauce!
(p.s. next time the BF says he will try baking the jalapeños before stuffing so you don’t need to bake at the end for them to be tender.)


Frying up the poppers- just don't let them go past brown to burnt!
And the finished product- enjoy!!

Savor it!
love, rue (and BF)

Monday, July 28, 2014

Traditional Potato Salad

Hey there everyone!

This recipe is thanks to my helping out for the 4th- I'm not really an eater of traditional potato salad, so I probably would not have brought you a recipe otherwise, but I was assured by all present that it was really good. Let me show you- super simple.

Here's your arsenal! Pretty simple, and colorful!
Chop potatoes and eggs, then mash roughly.
Add in your chopped veggies and mix well. (I forgot the pickles and added them later- just fine!)
Here are your seasonings and binder- change ratios to your taste.
Add your mayo and then your seasonings and mix well.
And finally, I added in the chopped pickled I forgot about earlier.

Sorry I don't have a picture of the finished salad- it's pretty similar to the above, just mixed and with paprika sprinkled on top. People gobbled it right up before I could think of it!


Traditional Potato Salad
-Potatoes, boiled
-Eggs, hard boiled and peeled
-Red onion, chopped
-Green onion, chopped
-Celery, chopped
-Radish, chopped
-Sweet pickles, chopped (or relish, whichever you prefer)
-Mayonnaise
-Pickle Juice
-Dry mustard
-Salt & Pepper
-Paprika
Chop potatoes and eggs once cool then mash roughly.
Mix in all of the other ingredients- using your own ratios and amounts to make it however you like it- don’t like something, don’t use it, and use more or less of ingredients depending on what you like. This is a really easy recipe to play around with the amounts of- just start slow with the mayo because that is almost impossible to fix.
Chill. Sprinkle with paprika to serve.

Savor it!
love, rue

Monday, July 14, 2014

Guest Post by Nora: Sauerkraut!

The Esteemed Mother has deemed today as proper to grace us with her presence and the sharing of a recipe she's just made. Take it away, Mom/Nora!
-------------------------

Sauerkraut, directly translated: "sour cabbage", is finely cut cabbage that has been fermented by various lactic acid bacteria, including Leuconostoc, Lactobacillus, and Pediococcus. Wikipedia

It has 25% of daily vitamin C, 8% of iron, and 5% of Vitamin B6 and Magnesium!

While European peasants preserved their cabbage with salt in an effort to keep hunger away during the dark months, their method of preservation fulfilled another need: that of optimal nourishment. The process of lactic acid fermentation used to transform salt and cabbage into sauerkraut increases vitamins, particularly vitamin C and B vitamins, and food enzymes.  Moreover, homemade sauerkraut is also extraordinarily rich in beneficial bacteria – friendly microorganisms which help to colonize the gut, train the immune system and manufacture vitamins in the digestive tract.  In winter, when colds and flus make their rounds, homemade fermented foods which provide plenty of vitamins, food enzymes and beneficial bacteria coupled with fermented cod liver oil (see sources).
http://nourishedkitchen.com/homemade-sauerkraut/


http://www.thekitchn.com/how-to-make-easy-homemade-sauerkraut-in-a-mason-jar-cooking-lessons-from-the-kitchn-193124
Sauerkraut is made by a process called lacto-fermentation. To put it (fairly) simply: There is beneficial bacteria present on the surface of the cabbage and, in fact, all fruits and vegetables. Lactobacillus is one of those bacteria, which is the same bacteria found in yogurt and many other cultured products. When submerged in a brine, the bacteria begin to convert sugars in the cabbage into lactic acid; this is a natural preservative that inhibits the growth of harmful bacteria.
The fermentation process itself is very reliable and safe, and the fermented sauerkraut can be kept at cellar temperature (around 55°F) for months, although those of us without cellars can make do with storing the kraut in our fridges. Besides preserving the cabbage, this fermentation process also transforms it into something incredibly tasty and gives it additional health benefits — fermented sauerkraut contains a lot of the same healthy probiotics as a bowl of yogurt.


How Long Does It Take To Make Sauerkraut?
For a small quart-sized batch like we're making today, the minimum time is about three days, though the kraut will continue to ferment and become tastier for many days after that. As simple as it sounds, the best rule of thumb is to keep tasting the kraut and refrigerate (or take it cellar temperature) when it tastes good to you. The sauerkraut is safe to eat at every stage of the process, so there is no real minimum or maximum fermentation time.


How to Make Homemade Sauerkraut in a Mason Jar
Makes 1 to 1 1/2 quarts

Ingredients:
1 medium head green cabbage (about 3 pounds)
1 1/2 tablespoons kosher salt
1 tablespoons caraway seeds (optional, for flavor)

Equipment:
Cutting board
Chef's knife
Mixing bowl
2-quart widemouth canning jar (or two quart mason jars)
Canning funnel (optional)
Smaller jelly jar that fits inside the larger mason jar
Clean stones, marbles, or other weights for weighing the jelly jar
Cloth for covering the jar
Rubber band or twine for securing the cloth

Instructions:
Clean everything: When fermenting anything, it's best to give the good, beneficial bacteria every chance of succeeding by starting off with as clean an environment as possible. Make sure your mason jar and jelly jar are washed and rinsed of all soap residue. You'll be using your hands to massage the salt into the cabbage, so give those a good wash, too.
Slice the cabbage: Discard the wilted, limp outer leaves of the cabbage. Cut the cabbage into quarters and trim out the core. Slice each quarter down its length, making 8 wedges. Slice each wedge crosswise into very thin ribbons.
Combine the cabbage and salt: Transfer the cabbage to a big mixing bowl and sprinkle the salt over top. Begin working the salt into the cabbage by massaging and squeezing the cabbage with your hands. At first, it may not seem like enough salt, but gradually, the cabbage will become watery and limp — more like coleslaw than raw cabbage. This will take 5 to 10 minutes. If you'd like to flavor your sauerkraut with caraway seeds, mix them in now.
Pack the cabbage into the jar: Grab handfuls of the cabbage and pack them into the canning jar. If you have a canning funnel, this will make the job easier. Every so often, tamp down the cabbage in the jar with your fist. Pour any liquid released by the cabbage while you were massaging it into the jar.→ Optional: Place one of the larger outer leaves of the cabbage over the surface of the sliced cabbage. This will help keep the cabbage submerged in its liquid.
Weigh the cabbage down: Once all the cabbage is packed into the mason jar, slip the smaller jelly jar into the mouth of the jar and weigh it down with clean stones or marbles. This will help keep the cabbage weighed down, and eventually, submerged beneath its liquid.
Cover the jar: Cover the mouth of the mason jar with a cloth and secure it with a rubber band or twine. This allows air to flow in and out of the jar, but prevent dust or insects from getting in the jar.
Press the cabbage every few hours: Over the next 24 hours, press down on the cabbage every so often with the jelly jar. As the cabbage releases its liquid, it will become more limp and compact and the liquid will rise over the top of the cabbage.
Add extra liquid, if needed: If after 24 hours, the liquid has not risen above the cabbage, dissolve 1 teaspoon of salt in 1 cup of water and add enough to submerge the cabbage.
Ferment the cabbage for 3 to 10 days: As it's fermenting, keep the sauerkraut away from direct sunlight and at a cool room temperature — ideally 65°F to 75°F. Check it daily and press it down if the cabbage is floating above the liquid.Because this is a small batch of sauerkraut, it will ferment more quickly than larger batches. Start tasting it after 3 days — when the sauerkraut tastes good to you, remove the weight, screw on the cap, and refrigerate. You can also allow the sauerkraut to continue fermenting for 10 days or even longer. There's no hard and fast rule for when the sauerkraut is "done" — go by how it tastes.While it's fermenting, you may see bubbles coming through the cabbage, foam on the top, or white scum. These are all signs of a healthy, happy fermentation process. The scum can be skimmed off the top either during fermentation or before refrigerating. If you see any mold, skim it off immediately and make sure your cabbage is fully submerged; don't eat moldy parts close to the surface, but the rest of the sauerkraut is fine.
Store sauerkraut for several months: This sauerkraut is a fermented product so it will keep for at least two months and often longer if kept refrigerated. As long as it still tastes and smells good to eat, it will be. If you like, you can transfer the sauerkraut to a smaller container for longer storage.


Your sauerkraut, just fermenting away!

-------------------------
Thanks Mom!
savor it!
love, rue

Monday, December 16, 2013

Cheesy Corn Souffle

Hey everyone!

I know this is a little late, but I made this for Thanksgiving this year, along with my traditional apple pie (check out other posts for how to make the pie!), though I think this would go well with almost any holiday meal. This was super easy to throw together and is amazingly delicious, moist, and cheesy. It got rave reviews and I was so glad to have an opportunity to make it for so many people! Let's get started.

Your super-simple arsenal- cream cheese, butter, eggs, cheese, corn, muffin mix, and green onions
Start out by creaming together your butter and cream cheese.
Mix in the whole kernel corn and creamed corn.
Add in your muffin mix and stir well.
Mix in your eggs...
Then mix in the green onions and cheese.
Pour mixture into a greased pan (this is a double batch in a 9x13'').
Then cover the top in cheese. Yumm!


Cheesy Corn Souffle
-2 tablespoons butter, softened
-1 (8 oz.) package cream cheese or neufchâtel, softened
-1 can whole corn, drained
-1 can creamed corn
-1 (8.5 oz.) package corn muffin mix
-2 eggs
-2 green onions, thinly sliced
-1 cup shredded cheddar, 1/4 cup mixed in, 3/4 cup on top
Cream together butter and cream cheese. Mix in corn, then muffin mix. Add the eggs and mix well. Season with a little salt and pepper, then stir in the green onions and cheese.
Top with the remaining cheese.
Bake in a greased 2 qt. casserole at 350 F for 45-50 minutes, or until a toothpick comes out clean.


And here it is finished- nice browned cheese on top, creamy and fluffy in the middle- sorry I don't have more pics, at this point the dish went through reheating, then got chowed down on by a big group of people!

Savor it!
love, rue

Monday, December 9, 2013

BLT Lettuce Wraps

Hey everyone,

This isn't so much a recipe as a twist on the classic BLT. Essentially, you take all the ingredients you would use in a BLT, and wrap them up in a lettuce leaf instead. It's totally filling, good for you, and completely delish- even I was surprised. But it's hard to go wrong with bacon- let me show you!

Here's your super-simple arsenal of ingredients...


BLT Lettuce Wraps
-head of lettuce, carefully take off each leaf to use as a wrap
-bacon, fried and crumbled
-tomato, chopped
-onion, sliced thin (optional)
-mayonnaise
-salt and pepper
Assemble all other ingredients inside of the lettuce leaf, then wrap up and enjoy- super easy, and yummy.
*another great idea is to wrap this all up inside a tortilla, something I discovered a few days after making this post*


The finished product (unwrapped so you can see!)! Mine is on the left with only a little mayo and no onions, and my BF Jordan's is on the right, with more mayo and onions. Delish!

Savor it!
love, rue

Monday, December 2, 2013

Tacos

Hi there!

Today is more of a concept-than-recipe day again- Jordan and I made tacos for his family the other week, and I'm going to show you one way to go about doing that! Feel free to substitute or add in your favorite meats, veggies, cheeses, etc.- this is all about creating it yourself.

Our arsenal (yours can be different!)- tortillas in the middle, fillings on the right, and toppings on the left.


Tacos
-tortillas, flour, corn, or both
all of the rest of the ingredients are ideas and are optional- just choose what you like.
-meat- ground beef, chicken, steak, whatever you like
-refried or regular beans
-white or brown rice
-salsa
-tomatoes
-onion
-lettuce
-avocados/guacamole
-cheese
-sour cream
-etc!
Just heat up your tortilla slightly, or fry in a dry pan real quick, then top with whatever you'd like from the list above, and add anything you like or can think of!


My (giant- we only had big flour tortillas) taco- refried beans, rice, veggies, and cheese- yumm!
And Jordan's tacos- flour on the left with meat and everything, and corn on the right, made vegetarian.

Savor it!
love, rue

Monday, November 18, 2013

Cheesy Bacon Roasted Potatoes

Hi everyone!

Today I've got a delish side dish that's warm and filling for these cold times that are creeping up on us! Roasted potatoes are one of my favorite things, but these are kicked up a notch with cheese, bacon, and garlic powder. Also a plus? these potatoes are super easy to make, and you can just stick them in the oven while you do other things or prepare the rest of dinner or lunch. And with this recipe, feel free to alter the amounts or kinds of cheeses, ranch, or bacon. Let's go!

Mix up all ingredients except the potatoes- cheese, ranch, bacon, and seasonings.
Then chop up your potatoes and mix it together well.
Pour mixture into a greased pan- I made a half recipe, so I used an 8x8'' pan.
After an hour at 350 under the foil and 15 minutes at 400 sans foil, remove and sprinkle with extra cheese before broiling.


Cheesy Bacon Roasted Potatoes
-6-8 russet potatoes
-1/2-3/4 cup ranch dressing
-1/3 cup shredded cheddar, and more for topping
-1/3 cup shredded monterey jack or pepper jack
-6 pieces bacon, cooked and crumbed
-1/4 teaspoon garlic powder (optional)
-1/2 teaspoon onion powder (optional)
-salt and pepper
Mix all ingredients except potatoes in a medium sized bowl.
Chop potatoes into bite-size pieces, then mix with the cheese, bacon, and ranch mixture.
Pour potato mixture into a greased 9x13'' pan (or 8x8'' for a 1/2 recipe)- use a larger pan if you want the individual pieces more crisped.
Cover with foil and bake at 350 F for 60 minutes, stirring potatoes halfway through.
Remove foil and raise heat to 400 F. Bake for 15 more minutes.
Sprinkle potatoes with cheese, then stick the pan under the broiler for 2-4 minutes, watching closely, until cheese is bubbly and brown.


And here's your finished product- yumm!! Enjoy.

Savor it!
love, rue

Monday, November 4, 2013

Baked Broccoli Fritters

Hey there everyone!

I hope you had a great Halloween! Now let's get on to a simple and delicious dish that's good for almost any time of day and comes together in minutes. I made this recipe as outlined below, but I imagine it would work equally well with different cheese(s), cauliflower instead of broccoli, or adding different seasonings- experiment! These are great for any meal of the day or a snack, and are great to have in the fridge or freezer to pop in the toaster oven for a snack.

Just put all your ingredients into a bowl...
And mix together well! Your mixture should look about like this.
Form into patties and place on parchment or an equivalent, or a greased baking sheet if you have none of the above.


Baked Broccoli Fritters
-16 oz. frozen chopped broccoli, thawed and drained
-3 eggs
-1 1/2 cups shredded cheddar
-1 cup breadcrumbs (seasoned or plain)
-salt and pepper to season
Mix all ingredients together.
Form into patties (whatever size you like) and place on parchment paper (or an equivalent, or grease the baking sheet) on a baking sheet.
Bake at 375 F for 25 minutes, flipping after 15 minutes.


Bake for 25 minutes, flipping about halfway through, and you'll be rewarded with these delicious morsels!


Savor it!
love, rue

Monday, September 30, 2013

Zucchini Bites

Hello!

These are fabulous. So fabulous I've made them a number of times since my first foray into the idea. I got this idea from a recipe, but changed the ingredients around a bit and changed the ratios to make them into how I like them. These are super simple to make, and great to have in the fridge to heat up in the toaster oven for a quick snack- fantastic!! Let's get going.

Your arsenal- zucchini, onion, cheese, egg, breadcrumbs. Pretty easy!
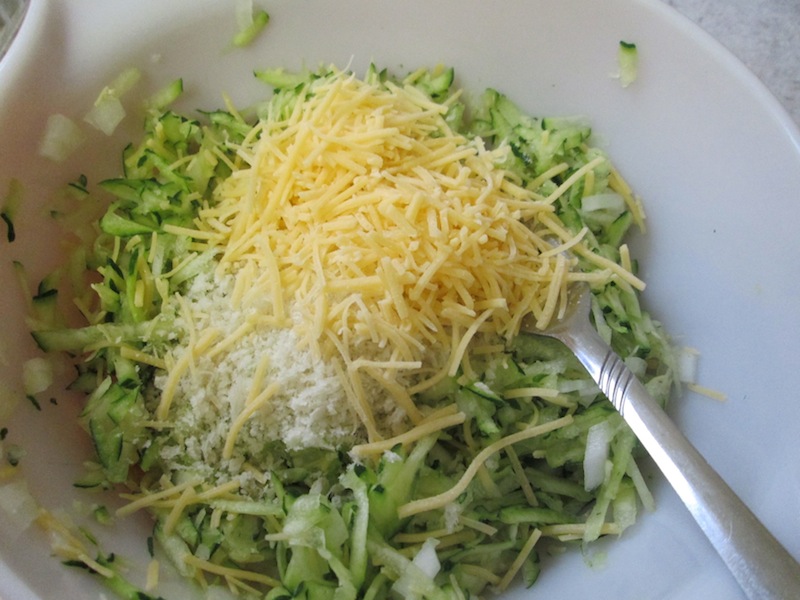
Mix together your 'dry' ingredients first.
And here's the finished zucchini mixture with eggs and all added.
Press into 12 mini muffin cups- greased!
Here they are just out of the oven- pulling away from the sides and starting to brown. Yummmmm!


Zucchini Bites
1 medium zucchini- grated then squeezed dry- about 1 cup
2 eggs, beaten
1/4 large onion, diced (or 1/2 small/medium onion)
1/2 cup shredded cheddar cheese
1/4 cup breadcrumbs
salt and pepper to taste
Combine all ingredients- use a fork or get your hands in there- and make it all uniform.
Spoon mixture into mini-muffin tins (makes 12) and press down the mixture in the muffin cups so that it will all stay together once baked.
Bake at 400 F for 16-18 minutes.


The finished bites- perfect as a side dish for any meal of the day, or great as a snack!

Savor it!
love, rue

Monday, May 13, 2013

Roasted Chickpeas

Hello again!

Ok, I have to admit that this recipe has been sitting in the files for a long time, and I only just got around to actually trying it out- about time! This is a super simple and healthy snack that you can season however you like- my kind of thing! On to the pics and recipe:

Drain and rinse your chickpeas, then pat dry with a towel.
Then in a small pot, add your oil and spices together.
And stir together over medium heat until you form a paste like this. Toss in your chickpeas to evenly coat.
Then dump your chickpeas onto a foil lined baking sheet, and turn every 10 minutes during baking.
Here are the finished chickpeas just out of the oven- seasoned and crispy.


Roasted Chickpeas
-1 (15 oz.) can chickpeas, drained, rinsed, and patted dry
-1 tablespoon olive oil
-2-3 teaspoons of spices of your choosing- this can go a lot of different directions!
Heat olive oil and spices in a small pot, stirring until a past forms. Toss in the chickpeas and toss to coat evenly.
Pour chickpeas out onto a foil-lined baking sheet.
Bake at 400 F for 30-40 minutes, stirring every 10 minutes, until browned.


All done! These are a perfect snack or appetizer, and feel free to take them any direction you choose!

Savor it!
love, rue