food isn't any good unless you have some fun!

come on in and enjoy!

Sunday, September 30, 2012

Meringue Mushrooms

Hi everyone! This post is going up a little early as I'm traveling and didn't want to take the chance of not getting to a computer in the morning!

Today I'm posting about a recipe that I actually made a long time ago with my wonderful Mom. This was for either a Christmas or New Years (think it was the latter), a year or two ago, and they were a huge hit. The concept is easy- you make meringues, then shape them into mushroom shapes, bake, and assemble. The end result looks fantastic (and like you spent a long time on it!) and is so much fun to eat- let's get to it.

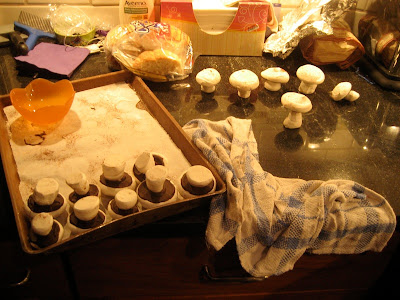
Sorry for the messy counter (wasn't thinking of blogging this!), but here are our baked meringues going through their assembly process- putting them upside down for the chocolate to set is essential- much easier.

Assembled Meringue Mushrooms- aren't they the cutest thing? And you can see from this that they do not need to be perfect or even for them to be beautiful, fantastic, and yummy to eat!


Meringue Mushrooms
-2 large egg whites
-1/4 teaspoon cream of tartar
-1/2 cup sugar
-1/4 teaspoon vanilla (optional)
-semi-sweet chocolate (for glue-ing the tops and stems together)
-cocoa (for dusting)
Beat room-temp. egg whites until foamy. Add the cream of tartar and beat until soft peaks form. Continue beating and add in sugar- beat until whites are stiff and all sugar has dissolved.
Put your meringue in a ziploc bag and cut a hole in the corner (or use a pastry bag if you're fancy!).
Pipe mushroom caps (make a flat circle) and stems (make meringue shapes that stand upright) onto cookie sheets covered in parchment paper.
Bake meringues for approximately 1 hour at 200 F. Rotate the baking sheets halfway through baking. Let meringues cool completely in the oven.
When the meringues are cool, melt your semi-sweet chocolate. Spread it on the underside of the 'caps', then 'glue' them to the stems. We used a microplane grater to smooth the tops of the stems if needed. Once assembled, we let the chocolate set with the mushrooms upside down.
Once mushrooms have set, dust the tops with cocoa powder.
(See this post at Joy of Baking for more tips on piping/shaping, though I did not use the recipe.)


We served our mushrooms in a 'food lanscape',  if you will. Brownies for land or a log, ice cream stones, and meringue mushrooms on top- get creative!

 Give this a shot- I was intimidated at first, but it's just a few more steps from a regular meringue recipe, which is really quite simple. Good luck- go and wow your friends.

Savor it!
love, rue
Monday, September 24, 2012

Squash Casserole

Hello!

I'm back again for part 3 of this meal I've been telling you about. Today I'm finishing off with a fantastic Squash Casserole. Now, let me assuage your fears if this seems too southern or too something to you- growing up in a family from the north of the US, I never ate squash until I was about 11, when one of my grandmother's caretakers made a version of this cheesy squash casserole for us. (To be totally true, the meal she made also included broccoli with cheese sauce and macaroni and cheese for the main dish- not sure I could handle all that cheese today!)

So, give this recipe a try if you can get your hands on some yellow crook-neck squash, or any other kind of similar squash- it should be delicious!

Here's the squash casserole after our attack on it- so it's clearly good. Give it a go!


Squash Casserole
The amounts are all approximate, just scale what you think you should use to the amount of squash you have- it’s hard to mess this up!

-Yellow crookneck squash (or other squash), sliced into 1/2 inch rounds, approx.

-Onion, chopped

-Milk
-Salt and Pepper

-Butter for the baking dish


-Cheese (we used Mozzarella and Asiago)

-Breadcrumbs
Chop up the onion and squash, and place in a microwaveable bowl with a splash of water.
Microwave, covered with a piece of waxed paper, for a minute or so to pre-cook the veggies.
To the bowl of squash, add a few splashes of milk, and some salt and pepper.
Place veggie mixture into the buttered baking dish, and top with cheese and breadcrumbs.
Bake, covered in foil, in a 350 degree oven for about 20-25 minutes, depending on how much you are making; finish the casserole, uncovered at 375 degrees for about 5 minutes, or stick it under the broiler for a moment (the objective being to brown that cheese on top), and enjoy!


And here's one last look at the meal we've created from this and the past two posts- combine, experiment, explore!

Savor it!
love, rue

Sunday, September 23, 2012

Candy Chocolate Chip Cookies

These cookies are delicious. Super delicious. And warm out of the oven? Even better!!

They're basically what they sound like: chocolate chip cookies with candy added, but the secret? You put a piece of chocolate-based candy in the middle of the cookie before baking. Let's get on to the pictures and recipe!


Here's the dough and the candies waiting to be combined- I used leftover easter candy!


Here are the cookies waiting for the oven- you can tell they're somewhat lumpy because of the candy.


Candy Chocolate Chip Cookies
-1 cup butter
-1 cup white sugar
-3/4 cup brown sugar
-2 eggs
-1 tablespoon vanilla
-3 1/2 cups flour
-1 teaspoon baking soda
-1/2 teaspoon salt
-1 1/2 cups chocolate chips
-Candy of your choice (fun size)
Cream the butter and sugars, then add the eggs and vanilla and mix well. Add the dry ingredients and mix until incorporated. Then stir in the chocolate chips. Once you have your dough, unwrap your candies, take some cookie dough, and wrap around the piece of candy so that it is completely covered.
Then bake at 350 F for 13-15 minutes.


And here are the baked cookies- enjoy!

Savor it!
love, rue

Monday, September 17, 2012

Roasted Asparagus

Hi all!

This is a follow-up post to last week's about the Soy Sauce Marinade. As with any good main dish, you need some good sides to go along with, so this week I'll be letting you know my simple recipe for Roasted Asparagus that we made to go along with the flank steak. I apologize for not having more detailed pictures- sometimes I just don't remember to take the pictures for blogging, so I hope you get the gist.


Roasted Asparagus
-Asparagus, washed and trimmed
-olive oil

-balsamic vinegar

-sea salt and fresh ground pepper
Put asparagus on a sheet pan, and drizzle with olive oil and balsamic vinegar. Season with sea salt and fresh ground pepper, and put under the broiler at approximately 400 degrees Fahrenheit. Keep the oven door open and watch asparagus closely- when it has started to brown and crisp a little, it’s done (5 minutes maybe, depends on your oven)- just take out of the oven and enjoy!


The asparagus, obviously, is in the lower left corner. Yum!


This recipe goes with just about everything, and you can apply this concept to other veggies too. Just keep in mind cooking times may change and not all veggies should be cooked under the broiler- it works for asparagus because it cooks so quickly, but some veggies take longer and should be given a little longer time at a little lower temperature.

I'll be back next week for the best recipe for our cheesy squash casserole that's also on this plate.

Savor it!
love, rue

Monday, September 10, 2012

Soy Sauce Marinade

Hello again!

I'm not much of a meat-eater at this point in my life (eating for almost 4 years in a mostly-vegan/vegetarian co-op can do that to you!), but this soy-sauce marinade is the best I know. My family traditionally uses this with flank steak, but you can use a skirt steak or seafood or anything you'd like. The recipe for the marinade is originally from a friend of my grandmother’s, Lita Palumbo, though of course it has gone through much tweaking since then…

Here's your finished steak with lovely flavorful burnt bits on the outside, etc. Also great leftover with sandwiches!


Flank Steak with Soy Sauce Marinade
This recipe is more for the marinade than for how to cook steak.
 
-flank steak (or skirt steak, etc.)

-8-10 oz. soy sauce (or less, depending on how much meat you have)

-2-4 oz. orange juice
-1 1/2 t ground ginger

-1 1/2 t ground mustard

-1 t garlic powder, or 4 cloves chopped garlic

-3 T brown sugar

-4 whole cloves, or a dash of ground cloves
Mix marinade ingredients in a dish or gallon plastic zip bag, and marinate for at least 3 hours, or overnight. Broil or grill according to the amount of time your piece of meat needs.


And this is the finished meal the steak went with- roasted asparagus and squash casserole on the side.

I'll be bringing you the recipes for roasted asparagus and squash casserole in my next two posts! Stay tuned.

Savor it!
love, rue

Monday, September 3, 2012

Chocolate Chip Cookie Pie

Hi again all!

I'm back in the states, so I'll be working with a (hopefully) more attainable set of ingredients for the next little while!

When I was younger, I attended a school which always had dessert at lunchtime, and one of the all-time favorites of almost everyone was the Chocolate Chip Cookie Pie. So when I came around to thinking of it again, I knew I had to figure out my own way to make this recipe. I don't have too many pictures, but it's a simple process, and the end result is beyond fantastic. Just make sure you have some people to share this with! It's a crowd-pleaser.


Chocolate Chip Cookie Pie
-3/4 cup butter (1.5 sticks), melted and cooled to room temp.
-1/2 cup sugar
-1/2 cup brown sugar
-2 eggs
-1/2 cup flour
-1 cup chocolate chips
-1 unbaked pie shell (you can buy it or make your own with my recipe here)
Beat together butter and sugars. Beat in eggs. Stir in flour, then chocolate chips.
Pour into pie shell, and bake for about an hour at 325 F.
Let cool about 10-20 minutes so you don't burn your mouth! This is fantastic with whipped cream or ice cream too.


Your finished pie: tuck in- it's delicious!


Savor it!
love, rue