food isn't any good unless you have some fun!

come on in and enjoy!

Monday, October 29, 2012

Creamed Corn

Hi again.

Here's a post that I maybe should have done at the height of summer when corn was at its best here in The States. But, I wasn't in country anyway, so I missed out on the sweet corn anyhow.

What I'm talking about today is creamed corn- the stuff you (or your mother) have a can of in the cupboard to make cornbread, use in a soup, casserole, etc. This, however, is a little bit of a different animal. It still has all the corn goodness and creaminess, but it's so much better, with still a little bite of the freshness of the corn- delicious.

This would make a fantastic side dish, serving probably 8-10 people, beside anything from hamburgers to more traditional southern fare (not my fave, but that is where it comes from!), to just about anything. Perfect for a potluck too- yumm!

Your arsenal: fresh corn, butter, milk/1/2 and 1/2/cream, salt, pepper, and sugar.

Here's all the fresh corn cut off the cob, with the milky stuff that you get from scraping the cob after cutting the kernels off.

Melt your butter, then add the corn.

The corn sautees for just a minute or two before...

You add the milk and cream, salt, pepper, and sugar, and give it a stir.

This is after about 25 minutes of simmering and reduction- there is still some creaminess in there at the bottom, but it isn't wet with it or too much.


Creamed Corn
(notes:
    -feel free to substitute any dairy and ratios for the cream/milk- just don't use all skim or it
     won't thicken very well- I thought this was good balance
    -I didn't chop the corn this time, but I think it'd be a bit more creamy if you did
    -I made only a 1/2 recipe and I think you could scale this any way you like.)
-8 ears fresh corn
-4 tablespoons butter
-3/4 cup milk
-6 tablespoons cream
-2 teaspoons salt
-1 teaspoons fresh ground pepper
-1 teaspoon sugar (when corn isn't at it's height)
Cut the kernels off of the ears of corn, then scrape the ears with the back of the knife. Give the corn a rough chop.
On medium/high heat, melt your butter in a skillet. Add the corn, stir, and wait a few minutes.
Add the milk, cream, salt, pepper, and sugar. Turn the heat down and simmer for 20 minutes or until thickened.
Turn the heat off, leave the pan on the burner, put a lid on, and let steam for 2 minutes or so.
Season with salt and pepper if necessary, and enjoy!


The finished creamed corn- so delish!


Savor it!
love, rue

p.s. I just came up with the most sinful idea whilst getting a snack to watch during the (football, like, with your feet) game. I looked in the fridge to get some creamed corn, and saw the half-package of bacon I have in there, and it came to me- the (a) way to make this better, to elevate it to the next level, would be to cut up some bacon, fry it up, and sprinkle it on top. If you want to get really decadent, I bet you could even use some or all of the bacon fat in place of the butter!! Whew- vegetarians/vegans beware of that idea!

Monday, October 22, 2012

Strawberry Jello Pretzel Bars

Hi there! I'm back again with a blast from the past-

I'm not sure where they're from geographically or anything like that (more likely a holdover from the jello-crazy years of the past), but probably about half of you had these as a kid. I always had them at family potlucks, and my Aunt Karla from outside of New Orleans always made them. Since I was a kid, I've only had these maybe once, maybe not at all- but always the delicious memory stuck with me, so I dug up some old recipes, decided on my own ratios, and whipped these up. The ingredients list is full of guilty pleasures, so this is a treat to eat without thinking about all the stuff that goes in it- just enjoy- and I know you will.

Strawberry Jello Cream Cheese Cool Whip Pretzel Bars, you could call them, all in all. But let me show you how it all comes together:

Here's your arsenal- simple simple simple.

Here's the crust- I whipped it up in the food processor, though you could mash with a rolling pin or whatever you like- I found it brings the crust together really nicely though (luckily I'm at home and get to use my mom's! I don't have one!). That whole bag above would do for a 9x13'' pan.

Press your crust into the bottom of a greased 9x13'' pan (I made a 1/2 batch, so this one's 8x8''), and bake at 350 F for 10 minutes. Cool completely.

Set out your cream cheese earlier to soften, then cream it with the cup of sugar.

And then fold in your whipped topping to finish this layer.

Then spread the mixture over the pretzel crust and refrigerate about an hour, or until set.

When the cream cheese layer has set, make your jello with half the amount of water called for, then stir in the frozen berries until they are thawed.

Pour your strawberry-jello layer over the top, and spread out the strawberries, and then, again, refrigerate until set!


Strawberry Jello Pretzel Salad Bars
-2 cups crushed pretzels (I used a food processor, but you can take a rolling pin to them or whatever you like)
-4 tablespoons white sugar
-3/4 cup (12 tablespoons) butter, melted
-1 cup white sugar
-2 (8 oz.) packages cream cheese (or neufchâtel, that's what I used- just don't use fat free!)
-1 (8 oz.) package frozen whipped topping, thawed
-1 (6 oz.) package strawberry jello
-2 cups boiling water
-16 oz. frozen strawberries
Combine pretzels, 4T sugar, and butter. Press into the bottom of a greased 9x13'' pan. Bake at 350 F for 10 minutes. Cool completely.
Cream the cream cheese and 1C sugar, then fold in the cool whip. Spread over the pretzel crust. Try to make sure this layer touches the sides of the pan and cover the crust completely to keep the jello from seeping through. Refrigerate at least 45 minutes to set.
Combine your 6 oz. Jello mix with the boiling water, then stir in the frozen strawberries until they are no longer frozen. Pour mixture over the cream cheese layer. Refrigerate 2 hours or until set. Enjoy!!


Here's a finished side-view, and you can see the layers really well- as you can see, mine aren't perfect, some of the jello seeped down one corner- try to make your cream cheese layer go all the way to the sides of the pan so the crust doesn't get soggy from the jello.


Try these out, even if you don't like jello very much- I don't, but this combo will knock your socks off! And it's very cheap to make, to boot. And when it's finally all set up and refrigerated, eat it in bars with a fork or plop a bunch in a bowl and settle down with a spoon!

Savor it!
love, rue

p.s. I just had an amazing thought about this recipe!!! Specifically my thought was that you could pour chocolate sauce over individual servings and it would be to die for! But more generally, you could customize this however you like- use different berries, use fresh berries, use a different flavor of jello, or top with anything from nuts to sprinkles to chips. Make it your own- this is only the beginning!

p.p.s. I was just eating some of this while watching some Flying Circus, and I had another great idea from this recipe- I thought about how not too much of it is jello, and most of it is pretzely saltiness and the cream cheesy layer- that gave me the thought of making a pretzel-crust cheesecake- does that not sound divine? I might have to give it a try!

Monday, October 15, 2012

Rice Krispie Treats (Regular and Chocolate!)

Hi!

Today I have a super easy recipe for you. Something that most people probably don't even need a recipe for, and after you've made it once or twice, you'll be ready to throw these together at a moment's notice too. You know what I'm talking about- those treats you loved as a kid and you secretly still do. Rice Krispie Treats. So simple, so indulgent and guilty-feeling, but oh so good. Yet another reminder that simple delicious happiness is only a few ingredients and a few minutes away!!

What I did a little differently today was that I made two half-batches of rice krispies- one the regular vanilla and one with some new chocolate marshmallows- yumm! I've made marshmallows before, and I'll make them again once my mom and I are in the same place again- it's a guilty pleasure of hers- and I'll blog those then. For now I won't go into more detail- I'll just show you the pictures, so even the most marshmallow-shy will know exactly what to do!

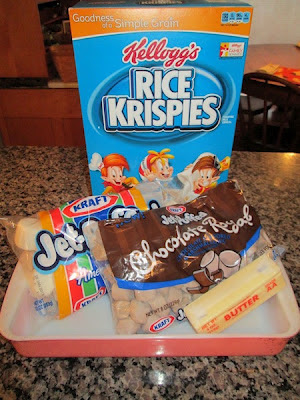
Here are your super simple ingredients- rice krispies, marshmallows, and butter.

Regular Krispies- all in quantities for a 1/2 batch.


Chocolate Krispies- same deal here for the quantities.


Rice Krispie Treats
Regular Batch
-3 tablespoons butter
-10 oz. (standard package) marshmallows (or 1-8 oz. container marshmallow fluff- your treats just won't be as firm, but they'll taste just as good, and be vegetarian!)
-6 cups puffed rice/rice krispies cereal
Chocolate Batch
-2 1/2 tablespoons butter
-8 oz. chocolate marshmallows (standard package)
-5 cups puffed rice/rice krispies cereal
Melt the butter in the microwave in a medium size bowl. Add marshmallows and microwave 30 seconds-1 minute. Stir together completely. Stir in puffed rice and press into a greased 11x7'' or 9x13'' pan. Refrigerate about an hour, or until firm.

If you want to get creative, you can stir in chocolate chips, ice/frost the treats, put on sprinkles, etc.- go wild!


Your butter and regular marshmallows, all puffed up and ready for the cereal.

Same deal here, but with chocolate marshmallows. They were a little smaller, so I microwaved for about 15 seconds less. If you end up using mini marshmallows or especially fluff, microwave less.

The finished treats- chocolate and vanilla. One of my secret favorite things, now times two!


Savor it!
Love, Rue

p.s. I promise the marshmallow recipe and steps soon, and when you make those, you can make whatever flavor you want, so you could really get creative here!

Monday, October 8, 2012

Chocolate Fondue

Ok, here's a post you should get excited about, if you're a chocolate lover (and why wouldn't anyone be?).

It's become some what of a New Year's Eve tradition in my nuclear family to make chocolate fondue- best thing I ever suggested. We have a fondue pot that was used often while my Mom was growing up, so it came from my grandparents and still works great (this explains the olive-green color!). It's super easy to make the fondue, and then all you have to do is assemble your favorite things to dip in chocolate (get creative!!!), and go to it. Let me show you this crazy easy recipe.

Here's our chopped chocolate and heating cream- easy as pie! (or easier, if I might say so!)


Here are some of our dippers- mixed dried berries, candied ginger, dried apricots, bacon (cooked!), meringues (regular and mint), pretzels, marshmallows, and toffee.


Chocolate Fondue
-semisweet chocolate (I used approx. 1/3 lb.)
-heavy cream or half and half (used about 1/2 cup)
-anything you like for dipping
Prepare your dipping items before you make the fondue, and everything will go much more smoothly- chop fruit or cake into bite-size pieces, etc.
Heat the heavy cream or half and half on the stove until very warm, but not boiling.
Meanwhile, chop the chocolate into small pieces, then add to the cream or half and half.
Whisk together until the chocolate is all melted, then pour the chocolate mixture into your dipping container, or fondue pot if you have one.
Then get to it and dip away!


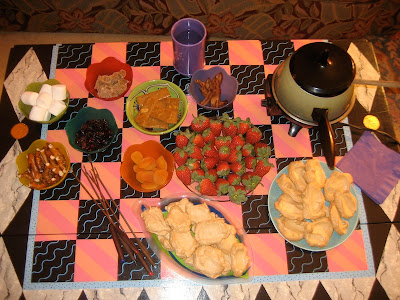
A more complete view of our spread, with the addition of our dipper of fresh strawberries- fantastic.. In this pic we also have our fantastic vintage fondue pot, and our fondue forks in the bottom left corner.

Because it was New Year's Eve, it was pretty cold, so we had a fire going and toasted some of our marshmallows before dipping- get way creative with this.


Another great tip for fondue is that if your dipping item is fragile, keep a spoon handy so that you can ladle some chocolate on top instead of losing your dipper in the fondue! The spoon is also handy for when that happens- the rescue spoon. Give this a shot- super easy, and everyone loves it. I've made it several times for several groups of people and it's always a hit.


Savor it!
love, rue