food isn't any good unless you have some fun!

come on in and enjoy!

Thursday, December 29, 2011

Whole Wheat Chocolate Chip Walnut Craisin Cookies (guest post by Nora/Mom!)

Hello again! This post is brought to you again by my lovely mother who was kind enough to share with me! I hope you enjoy. Take it away, Mom!


Whole Wheat Chocolate Chip Walnut Craisin Cookies
1 cup butter
2/3 cup brown sugar
2/3 cup sugar
2 eggs
2 teaspoons good vanilla

1 teaspoon baking soda
1 teaspoon salt
1/2 teaspoon baking powder
3 cups quick oats
1 cup craisins
1 cup chocolate chips (semi sweet)


Cream the sugars and butter together, then add eggs and vanilla and beat till smooth. Add dry ingredients – except for 2 cups of oatmeal.

Remove from mixer and stir in the rest of the oatmeal. It will be a stiff batter.


Plop the batter onto baking sheets.

We love using parchment paper ... And we use it over and over again. Bake about 10 min.


The Done Deal ...!

I know we talk about this all the time, but what amazing satisfaction is gained by being able to put a few ingredients into a bowl and whip up something truly wonderful! You can omit the chocolate, or use white chocolate, or use raisins instead... Go wild, all is good in Cookie World.

And here's the recipe all together for ease of use!

Whole Wheat Chocolate Chip Walnut Craisin Cookies
1 cup butter
2/3 cup brown sugar
2/3 cup sugar
2 eggs
2 teaspoons good vanilla

1 teaspoon baking soda
1 teaspoon salt
1/2 teaspoon baking powder
3 cups quick oats
1 cup craisins
1 cup chocolate chips (semi sweet)

Cream the sugars and butter together, then add eggs and vanilla and beat till smooth. Add dry ingredients – except for 2 cups of oatmeal. Remove from mixer and stir in the rest of the oatmeal. It will be a stiff batter.
Preheat oven to 375 F. Plop the batter onto baking sheets. We love using parchment paper ... And we use it over and over again. Bake about 10 min.


Thanks mom!
Savor it!
love, rue

Wacky Cake (1970s!)

Hello! I am back from my hiatus, and hope to post about once a week for the foreseeable future. The cake I'm blogging about today is a recipe from the 1970s that I made for my 1970s seminar when we had a potluck for our last class of the semester. It's a vegan chocolate cake made with vinegar, with a slightly grainy chocolate icing- pretty damn good!

Here are the cake ingredients in the pan, with the wells for the wet ingredients...


And here's the batter, all mixed up- you make it right in the pan, so easy!!

And here's the cake all baked up!
Here's the icing ingredients being added together on the stove.

And here's the icing all finished up.

The finished cake!! It's chocolatey and super easy to make.

And here's the recipe! I thought it best to reprint it from where I found it, with the source.

Savor it!
love, rue

Sunday, December 4, 2011

Small Hiatus

Hi everyone,

I'm extremely busy right now and don't have the time to get blog posts up. I have a few in the wings from my mom and I, but I won't be able to put them up until around or after Christmas.

Please check out my earlier recipes, especially my holiday cookie ones (some of my first posts), and give them a shot! I hope you enjoy.

Savor all the food you have until I write next!
love, rue

Tuesday, November 29, 2011

Thanksgiving Sides! (cornbread, Yorkshire pudding, and mashed potatoes!)

Hello all!!

I had a great thanksgiving with lots of delicious food, and I hope that you did too! If not, every day is an occasion to eat fantastically, so take a look at these side dishes we made! The first is caramelized onion and apple and honey cornbread, then classic mashed potatoes, then the Yorkshire pudding (which went with the standing rib roast we had! but alas, I have no pictures of).

First, my sister Dare made the cornbread. She asked us to decide between a few off-beat cornbread recipes and my mom and I voted for this one. It made an absolutely delicious and moist cornbread that was as delicious as leftovers as it was for dinner!


here's the link for the recipe for the cornbread, as I didn't make it!
http://cooking-books.blogspot.com/2011/03/honey-caramelized-onions-and-apples.html


Second, the mashed potatoes. These are really, really simple but so tasty! I quartered some red potatoes, boiled them until fork-tender, then mashed them up with butter, milk, and cream then topped it off with salt and pepper. Feel free to make them classic like these, or to add cheese or some spiciness or whatever you feel like!


Third, the Yorkshire pudding! This is possibly one of my most favorite foods in the world (apologies if I have posted about it before- one forgets!). It's basically a thin batter and beef fat cooked to great heights! It's fantastic. Here's the recipe from my mom.

Yorkshire pudding, a culinary delicacy
-3 eggs
-1 cup milk
-3/4 C flour
-1/2 t salt
Mix these up well beforehand and chill. Doesn’t need beating, my mom made it in a big shaker.
When the roast is done, put about 1/2 c drippings and beef fat in a 13 x 9 pan. Put the pan and drippings in a450 oven for 5-10 min until it is smoking hot. Then pour the egg mixture into the middle of the pan and quick put it back into the oven. Check after 15 min but try to get to 20 — 25 min so the inside part is done. Cut into big squares and serve hot. This is actually better than the meat itself.


Here's the billowing Yorkshire pudding- it's like a giant popover!


Savor it!
love, rue

Thursday, November 24, 2011

Glazed Pumpkin Cookies

Happy Thanksgiving!!! Take some time today to remember what you're thankful for, including some damn good food. And then think about making these :) you'll be thankful for them!

These are super simple to whip up and completely delicious- good pumpkin flavor, etc. I hope you give them a shot! This recipe is heavily based on Libby's classic recipe, but I've made a few tweaks, so here are the pictures and recipe!


Here's the batter...


And the cookies all ready for the oven...


And all baked up!


Glazed Pumpkin Cookies
-1/2 cup butter, softened
-1 1/2 cup sugar
-1 cup pumpkin
-1 egg
-1 teaspoon vanilla
-2 1/2 cups flour
-1 teaspoon baking soda
-1 teaspoon baking powder
-1 teaspoon cinnamon
-1/2 teaspoon ground nutmeg (I used freshly grated)
-1/4 teaspoon salt
Cream the butter and sugar, then mix in the pumpkin, egg, and vanilla. Stir in the dry ingredients.
Bake at 350 F for 15-17 minutes on greased baking sheets or parchment paper.
Let cool completely before glazing.

Glaze:
-2 tablespoons milk
-2 teaspoons melted butter
-1 teaspoon vanilla
-1 to 1 1/2 cups powdered sugar
Mix together until smooth. Put on top of cookies.


Here's the glaze all made- it's super simple.


And the finished cookies!

Enjoy your holiday, and Savor it!
love, rue

Saturday, November 19, 2011

English Muffins (guest post by Nora/Mom!)

Hello! Today's post is a guest post from my Mom who made some delicious looking english muffins recently! I say they look delicious because I'm not at home right now and didn't get to have any, but I have on her word that they're great- they look all craggy and holey for all your butter (or topping of your choice) to go in. Take it away Mom!
--------------------------------------------------------------

I hadn't made English Muffins in a long time. I started to see recipes that included a little baking soda, and since I'm all about more bubbles, spaces and holes in my bread, I decided this needed investigation. I ended up using the following recipe from thefreshloaf.com which is actually a recipe for crumpets (research showed that crumpets are just english muffins that are not toasted on the top). The recipe recommended making the dough just a bit stiffer for muffins.

I put all the dry ingredients in a bowl and used 1/3 C dry milk instead of the cup of milk (do not use the soda and water yet). Then I added 1/1/2 C of warm water and beat it for 5 min in the kitchen aid. It was a very stretchy, wet batter.


I found the batter was ready in less than 2 hours, so I went ahead and used it. This is when you dissolve the soda in water and beat it into the dough. Then let it set  30 min while you prepare your baking method. I decided to use the pancake grill because it would have room for 8 at a time. I made rings from folded over strips of foil. (of course everybody says to use tuna cans… but when was the last time you had 4 or 6 cans of tuna for dinner?). Grease the rings very well and set them on the greased hot surface. Flop about 1/4 cup dough into each ring, spreading if necessary. Mine was wet enough that it flowed to the edges.


Next time I'll try using a pan on the stove because the pancake grill heated very evenly but it was awfully slow. After about 8 minutes I was able to flip them, and gave them about 5 min more on the second side.


I've read others experiences, and next time I will finish these in a 350 oven for maybe 8 minutes, as my muffins were slightly too wet in the middle.

They were beautiful, tho, as you can see. And toasted, what a dream. Actually we used most of them as hamburger buns. Loved that because normally there is way too much bun compared to burger. This was perfect. Good luck with your own english muffins, they are going to be so much better than store bought. (They freeze well too!)


INGREDIENTS
1/2 cup warm (approx. 110°F) water
1/4 teaspoon sugar
2 teaspoons active dry yeast
1 cup warm (approx. 110°F) milk
3/4 teaspoon salt
2 cups King Arthur Unbleached All-Purpose Flour (for crumpets) or 2 2/3 cups King Arthur Unbleached All-Purpose Flour (for English muffins)
1/8 teaspoon baking soda
1/4 cup lukewarm water
INSTRUCTIONS
-Combine the warm water, sugar and yeast in a large bowl and let sit until foamy. Add the warm milk and salt to the yeast mixture, then stir in the flour. Beat hard, using an electric mixer, for 5 minutes (this beating, as well as the addition of baking soda just before cooking, will help the finished muffin develop its holes). Cover bowl, set in a warm place, and let batter rise for 3 hours, or until it is very bubbly. Don't worry if the batter bubbles up, then falls down; if it does, just proceed to the next step.
-Dissolve the baking soda in the 1/4 cup lukewarm water, and stir it gently into the batter. Let rise again, this time for only 30 minutes.
-Heat a greased plett pan (first choice), frying pan or griddle over low heat for 10 minutes. Spoon about 1/4 cup of batter into each ring in the plett pan, or spoon batter into circular shapes on a griddle or frying pan. Tuna cans, well-cleaned and with both ends cut off, are useful in containing the crumpet batter. Just set them on your frying surface, being sure to grease well first.
-Crumpet batter will spread easily; English muffin batter, which is thicker, needs to be nudged into a round shape with the back of a spoon or fork.
Let English muffins cook 5 to 8 minutes, or until bottoms are golden, then flip over and let the other side cook the same amount of time, removing from pan when both sides are brown.
-For crumpets, cook 8 minutes without turning; tops will be uncolored but dry, and full of holes. Place muffins on a wire rack to cool. To serve, split English muffins and toast; toast crumpets without splitting. Serve with butter and jam, or a fruit butter, such as the one that follows. Makes approximately 16 3-inch muffins.
-------------------------------------------------------------

Thanks for the post Mom, and I hope the rest of you go out and make some english muffins!
Savor it!
love, rue

Monday, November 14, 2011

Snickerdoodle Bars

Hello again!

These bars, as usual with most of my recipes, are super easy and quick to mix up. Then you just pop them in the oven, wait about 30 minutes, and let your house fill with the delicious cinnamon-y smell. Let them cool, slice them up, and en-joy. These are delish, and taste just like a snickerdoodle in a bar.


Here's the dough, all mixed up.


And here are the bars topped and ready for the oven.


Snickerdoodle Bars
-1 cup butter, softened
-2 cups brown sugar
-2 eggs
-1 tablespoon vanilla
-2 2/3 cups flour
-2 teaspoons baking powder
-1 teaspoon cinnamon
-1/4 teaspoon nutmeg
-1/2 teaspoon salt
top with:
-2 tablespoons white sugar
-2 teaspoons cinnamon
-pinch nutmeg
Cream the butter and sugar, then mix in the eggs and the vanilla well. Add the dry ingredients and stir in.
Transfer the batter to a greased 9x13'' pan, and pat down evenly with your hands or a spatula.
Bake at 350 F for 25-30 minutes. Let cool completely, then slice.


And here are the bars all baked up- golden brown and fabulous!

Savor it!
love, rue

Thursday, November 10, 2011

Chocolate Oat Bars

This recipe is super simple, and super delicious. I wrote it down from the back of a package of chocolate chips a while back, and decided to give it a go. I'm having to pace myself so that I don't gobble it all up! It's a simple crust pressed into the bottom of the pan, topped with a chocolate mixture and topped up with the rest of the crumbs from the crust. So easy, and definitely impressive!


Here's the dough all mixed up...


And the chocolate mixture to go on top.


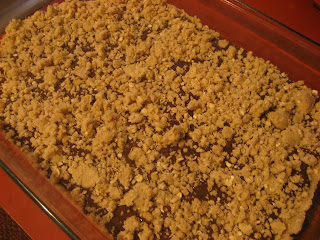
And here are the bars ready for the oven!


Chocolate Oat Bars
-3/4 cup butter, softened
-1 cup brown sugar
-1/2 teaspoon salt
-1 1/2 cups flour
-1 cup oats
-1 can sweetened condensed milk (14 oz.) (I used fat free with no detriment)
-1 cup chocolate chips
Cream the butter, sugar, and salt, then mix in the flour and oats until crumbs form. Press 2/3 into the bottom of a 9 x 13'' pan. Microwave the sweetened condensed milk and chocolate chips together for about a minute, then stir until smooth. Pour over the crust. Top with the remaining 1/3 of the crust crumbs.
Bake at 350 F for 30-35 minutes or until golden brown.


And here they are all baked up- yummmm!!

Savor it!
love, rue

Saturday, November 5, 2011

Pumpkin Muffins (or bread!)

Today I have for you a deliciously simple recipe for pumpkin muffins or bread. It's just the right time of year for a pumpkin-based recipe, and this one isn't too sweet or overpowering- just right! You just mix all the ingredients and they bake up to beautiful browned peaks- let's get to those pictures and that recipe!


Here's the batter all mixed up...


The muffins all ready to bake...


And the breads all ready for baking too!


Pumpkin Muffins/Bread
-4 eggs
-2 cups sugar
-1 can pumpkin (15 oz)
-1 1/2 cups vegetable oil (I replaced 1 cup with applesauce and they turned out great!)
-3 cups flour
-2 teaspoons baking soda
-2 teaspoons baking powder
-1 teaspoon cinnamon
-1/2 teaspoon salt
-1 1/2 cups walnuts, chocolate chips, etc. (optional)
Mix up the eggs, sugar, pumpkin, and veggie oil/applesauce. Stir in the dry ingredients. Then stir in any add-ins that you'd like (I used walnuts).
Bake at 400 F for 15 minutes for muffins, or for 30-35 minutes for bread.
Cool for 5 minutes, then finish cooling on a cooling rack.


And here are the delicious goodies all baked up and beautiful- please try, and enjoy!!

Savor it!
love, rue

Monday, October 31, 2011

Coconut No-Crust Pie

Hello all,

This recipe is super simple and produces an elegant dessert. You just whip up the ingredients, pour into a pie pan, and bake. I made this yesterday and will be enjoying it for the days to come. Let's get on to the pictures and recipe so you can make it too!


 here's the batter for the pie...


and the pie ready for the oven.


Coconut No-Crust Pie
-1 cup sweetened coconut (flaked or shredded)
-1 cup milk
-3/4 cup +  2 tablespoons white sugar
-1/4 cup + 2 tablespoons flour
-2 eggs
-3 tablespoons melted butter
-1/2 tablespoon vanilla
Mix all ingredients together well. Pour into a greased 9'' pie pan.
Bake at 350 F for 30-40 minutes or until golden brown. Enjoy!


and here's the golden brown finished pie- try it yourself!

Savor it!
love, rue

Tuesday, October 25, 2011

Coconut Macaroons

Hello all,

This will be a quick post as I am on vacation visiting my mother this week. But I have a great and delicious recipe for you that will hopefully brighten your Octobers! These macaroons have huge coconut flavor and are light and crispy on the outside and chewy on the inside. I forgot to take a picture of the 'batter', but it's basically white and glossy with coconut.


Here are the macaroons in the oven...


And here they are all baked up!


Coconut Macaroons
-2 egg whites
-1/2 teaspoon vanilla
-1/4 teaspoon salt
-2/3 cup white sugar
-2 cups flaked/shredded coconut
Beat the egg whites, vanilla, and salt to soft peaks. Add the sugar and beat to stiff peaks. Fold in the coconut.
Bake at 325 F for 20 minutes or until golden brown on a greased cookie sheet.
Then enjoy!


Don't they just look divine?

Savor it!
love, rue

Thursday, October 20, 2011

Poached Eggs in Tomato Sauce

Hi everyone, this time we have a guest post from my awesome sister Dare... take it away!


So I found a recipe online at smittenkitchen.com for poached eggs in tomato sauce. I decided to take that idea up a notch. Now in her recipe the tomatoes came from a can so I thought, I could do better than that.

I made my own tomato sauce. First I diced four cloves of garlic and browned them in olive oil. Then I chopped up three tomatoes and added them to the pot. I don't really measure my spices so I just added some basil, thyme, salt, pepper, and a little bit of red pepper. Then I added two big gluggs of red wine. Then I let the whole thing simmer for 5-10 minutes so the flavors could meld.


In the meantime, toast some bread. I used some homemade sourdough bread that I had made. once the bread is nice and toasty, (and don't worry about it getting too toasty, there's no such
thing) rub the top of the toast with another clove of garlic, just like when you're making brushetta.


Then crack your eggs right into the tomato sauce. this was my first attempt at poaching eggs so they weren't perfect but damn were they tasty. Once you add the eggs it turns into a watching game. Mine took maybe 6 minutes? but they were slightly over done by the time I sat down to eat. Remember that the egg will continue cooking even after you take it off the heat.


So once the egg is cooked to your liking (my instructions are for a runny poached egg) pour the tomato sauce and poached eggs on top of your garlic toast. eat with a knife and fork. this was delicious!


This dish is perfect for breakfast/brunch or lunch, it's light but the egg is adds richness. also this recipe makes a lot of sauce so thicker slices of bread are preferable. Enjoy!
-D

Saturday, October 15, 2011

Pretzel Rolo Bites

These are delicious. Seriously delicious. And so easy to make, you'll want to make more just as soon as you've gobbled up your first batch!


Here are the pretzels and rolos...


And here they are all baked up and topped- yumm!


Pretzel Rolo Bites
-pretzel snaps (quilted looking squares)
-rolos
-m&ms or other toppings (nuts, etc.)
Line a cookie sheet with foil, and preheat the oven to 220 F.
Lay out the pretzels, then lay the rolos on top of them. Bake for 3 minutes.
Press toppings into the top of the pretzel/rolo combo, let cool, and enjoy!


Savor it!
love, rue

p.s. I'll be posting a guest post from my wonderful sister, Dare, for my next post! Get excited.

Monday, October 10, 2011

Maple Buttermilk Pie

I quickly whipped up this pie yesterday while trying to keep our oven from smoking copiously (something which might keep me from blogging for a little while until it gets fixed!). I used a pre-made pie crust, bre-baked it, whipped up the filling, and baked it and it is delicious. It's creamy and custardy, and there's really only one thing I would change if I were to make it again- I would leave out the lemon zest, as I don't feel it is necessary, though you are certainly welcome to take this pie in any direction you choose! I have a lot of ideas about different flavors, etc.


Here's the unbaked pie shell...


And the baked pie shell.


And the yummy filling to go inside...


And the beautiful pie all baked up!


Maple Buttermilk Pie
-one pie crust, pre-baked at 375 F for 20 minutes
-zest of one lemon (optional!!! I found it a little overpowering)
-2 tablespoons brown sugar
-6 egg yolks
-1/4 cup flour
-2/3 cup maple syrup (pref. grade b)
-2 cups buttermilk
-1 teaspoon vanilla extract
-scant 1/2 teaspoon fine grain sea salt
Pre-bake pie crust, then whip up filling, add to pie crust, then bake 1 hour at 325 F.
Chill completely before slicing!


Here's the finished pie, all ready to be eaten.
Savor it!
love, rue