food isn't any good unless you have some fun!

come on in and enjoy!
Showing posts with label pie. Show all posts

Monday, March 4, 2013

Nutella Oreo Mousse Pie

Hey- this is a quick recipe that has amazingly tasty results. So here's a quick post of a dessert you can whip up fast and ahead of time, and you can make a big pie for everyone, or split this into individual dishes for nicer-looking plating. Garnish with whatever you like- chopped nuts, chocolate- and make it your own. You could also use a different kind of crust, but I like the chocolate crust with the lighter filling. Let's do this. Warning, though: you may end up making this pie today!

Simple ingredients- fast prep!!
Cream together your nutella, cream cheese, vanilla, and pinch of salt.
And you get this fantastic chocolatey ness that you will want to eat with a spoon- try to resist!
Then fold in your cool whip.
Until you have your filling- doesn't look too appetizing in a bowl but it is delicious I promise!


Nutella Oreo Mousse Pie
-oreo crust, store bought or homemade by crushing cookies and mixing with melted butter and pressing in pan
-1 8 oz. block cream cheese, softened
-2/3 cup nutella
-1 teaspoon vanilla
-1/8 teaspoon salt
-8 oz. cool whip, mostly thawed (thaw in refrigerator)
Beat together the cream cheese, nutella, vanilla, and salt. Fold in thawed cool whip.
Pour into oreo crust, and refrigerated for 4-6 hours or overnight. Could also be made into individual servings.


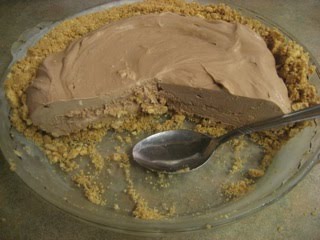
Again, I must admit this is not the most appetizing dessert if you leave off all garnish and just make it to eat it like I did, but it tastes great and has a lot of potential for different versions and applications.

Savor it!
love, rue

Tuesday, December 18, 2012

Double Crust Apple Pie

Hi everyone!
Today I'm doing a post about what I made for Thanksgiving dessert. I know, Thanksgiving was like a month ago- this exposes my secret of doing posts ahead of time! Anyway, this pie is super easy to throw together and absolutely delicious. You can make your own pie crust (see this post), or buy crust at the store in the refrigerator section and it's almost just as good. Just don't use frozen pie crust- it just isn't the same at all, I've found.

Anyway! Hop to it and make this pie. It's so simple but always a hit- great flavor and fantastic served warm with ice cream. Special enough to make for an occasion, but easy enough that you can make it for dessert tonight! Let's go!

Put your bottom crust in the pan, and trim off the excess (I hadn't trimmed yet in this picture).
Toss your sliced apples with the dry ingredients.
Then toss in the milk or 1/2 and 1/2.
Then put those apples in the crust, and put on a top crust. You can do a design, slits, lattice or whatever you like!


Double Crust Apple Pie
-4-5 medium large green apples, peeled and sliced
-splash or two of lemon juice
-2/3 cup of sugar
-1 tablespoon flour
-1 teaspoon (more more depending on your taste) cinnamon
-2 tablespoons milk or 1/2 and 1/2
-2 tablespoons butter
-2 pie crusts, homemade (link) or store-bought
Put one pie crust in the bottom of an ungreased pie pan.
Toss apples with lemon juice.
Add sugar, flour, and cinnamon; toss well.
Toss in the milk or 1/2 and 1/2.
Pour all the apples, sugar, etc. into the pie crust.
Top with the other pie crust- cut slits at least to allow steam to escape.
You can also cut a pattern out of the top crust or do it lattice style.
If doing a non-lattice style crust, make sure to seal the two crusts together at the edge for minimal overflow.
Bake at 400 F for about 50 minutes, or until a fork stuck in the apples goes in easily.
I always bake the pie with the pie pan on top of a cookie sheet with sides, just in case there is the (inevitable) bit of overflow- much easier than cleaning your oven!
Serve warm or cool, with milk or vanilla ice cream.


And here's your finished pie- don't worry if it doesn't look like a million bucks- it will taste like it!

Savor it!
love, rue

Monday, September 3, 2012

Chocolate Chip Cookie Pie

Hi again all!

I'm back in the states, so I'll be working with a (hopefully) more attainable set of ingredients for the next little while!

When I was younger, I attended a school which always had dessert at lunchtime, and one of the all-time favorites of almost everyone was the Chocolate Chip Cookie Pie. So when I came around to thinking of it again, I knew I had to figure out my own way to make this recipe. I don't have too many pictures, but it's a simple process, and the end result is beyond fantastic. Just make sure you have some people to share this with! It's a crowd-pleaser.


Chocolate Chip Cookie Pie
-3/4 cup butter (1.5 sticks), melted and cooled to room temp.
-1/2 cup sugar
-1/2 cup brown sugar
-2 eggs
-1/2 cup flour
-1 cup chocolate chips
-1 unbaked pie shell (you can buy it or make your own with my recipe here)
Beat together butter and sugars. Beat in eggs. Stir in flour, then chocolate chips.
Pour into pie shell, and bake for about an hour at 325 F.
Let cool about 10-20 minutes so you don't burn your mouth! This is fantastic with whipped cream or ice cream too.


Your finished pie: tuck in- it's delicious!


Savor it!
love, rue

Monday, October 31, 2011

Coconut No-Crust Pie

Hello all,

This recipe is super simple and produces an elegant dessert. You just whip up the ingredients, pour into a pie pan, and bake. I made this yesterday and will be enjoying it for the days to come. Let's get on to the pictures and recipe so you can make it too!


 here's the batter for the pie...


and the pie ready for the oven.


Coconut No-Crust Pie
-1 cup sweetened coconut (flaked or shredded)
-1 cup milk
-3/4 cup +  2 tablespoons white sugar
-1/4 cup + 2 tablespoons flour
-2 eggs
-3 tablespoons melted butter
-1/2 tablespoon vanilla
Mix all ingredients together well. Pour into a greased 9'' pie pan.
Bake at 350 F for 30-40 minutes or until golden brown. Enjoy!


and here's the golden brown finished pie- try it yourself!

Savor it!
love, rue

Monday, October 10, 2011

Maple Buttermilk Pie

I quickly whipped up this pie yesterday while trying to keep our oven from smoking copiously (something which might keep me from blogging for a little while until it gets fixed!). I used a pre-made pie crust, bre-baked it, whipped up the filling, and baked it and it is delicious. It's creamy and custardy, and there's really only one thing I would change if I were to make it again- I would leave out the lemon zest, as I don't feel it is necessary, though you are certainly welcome to take this pie in any direction you choose! I have a lot of ideas about different flavors, etc.


Here's the unbaked pie shell...


And the baked pie shell.


And the yummy filling to go inside...


And the beautiful pie all baked up!


Maple Buttermilk Pie
-one pie crust, pre-baked at 375 F for 20 minutes
-zest of one lemon (optional!!! I found it a little overpowering)
-2 tablespoons brown sugar
-6 egg yolks
-1/4 cup flour
-2/3 cup maple syrup (pref. grade b)
-2 cups buttermilk
-1 teaspoon vanilla extract
-scant 1/2 teaspoon fine grain sea salt
Pre-bake pie crust, then whip up filling, add to pie crust, then bake 1 hour at 325 F.
Chill completely before slicing!


Here's the finished pie, all ready to be eaten.
Savor it!
love, rue

Tuesday, July 12, 2011

Fat Girl Pie

This recipe came to me via one of my closest friends and my former housemate, the amazing Helena Thompson. Her wonderful mother (hi Mama T!) gave her this recipe when she was in a bit of a time crunch once, and it's been a runaway success with all of our friends since. I now make this pie fairly often, because of its extreme simplicity and deliciousness. It's especially great in the summer because it's a nice cool frozen pie. Let's get on to the recipe and pictures!!


Here are the ingredients- so simple it blows your socks off!


Fat Girl Pie
-1 8oz. container Cool Whip (or similar), can be fat free etc.
-1 can sweetened condensed milk
-1 packet unsweetened lemonade mix
-1 graham cracker crust
Mix the first three ingredients until uniform (or almost, a few pieces of cool whip is nothing to worry about). Pour into the graham cracker crust, and freeze for a few hours. Then enjoy!


Easy, huh? It's fabulous. Let me show you...


Mix the first three ingredients...


And you get this!


Then pour into the crust and freeze- so easy!

Savor this one and major thanks to Helena and Mama T!
love, rue

Monday, May 9, 2011

Nutter-Butter Nutella Pie

This pie is delicious. It's so good it'll make you dance around and scream with joy. Really, that good. I've made this twice recently and friends and housemates (and myself) have gobbled it up with abandon. So on to the recipe!


Here's the pie in all its glory.


Nutter-Butter Nutella Pie
-24 nutter-butter cookies
-1/4 cup melted butter
-16 oz. cream cheese
-3/4 cup white sugar
-1 teaspoon vanilla
-1/2 cup nutella
-1/2 cup whipping cream
Crush the cookies, then mix with the melted butter and push into the bottom and sides of a pie pan.
Cream the cream cheese and sugar, then add the vanilla and nutella and mix well. Add the whipping cream and whip until thick.
Pour the nutella mixture into the crust you have made and chill for a few hours. Then enjoy!


And here's the pie after we got our hands on it!

Savor it!
love, rue

Friday, January 28, 2011

Apple Pie!

Apple Pie. There just aren't many things like it, especially in my family. We have a long tradition of making lots of apple pie in the summer when the June apples come in, and then we have it for dinner- with milk for dinner and with vanilla ice cream for dessert! If I was being absolutely true to that tradition, I would have made a deep-dish apple pie for this post, but I was called by the beauty of my mini-muffin tin and made about 24 mini apple pies instead- so cute! And added bonus, they will serve as individual desserts for the people my housemate is having over this evening! I so can't wait to try one of these little beauties- they're still too hot out of the oven!

Apple pie is warm, comforting, and truly part of the fabric of my life, and I encourage you to make it a part of yours- it's really not hard to make, and is such a delicious dessert (or entree!). For these little pies, I used homemade pie crust that I made the other day (see last post), but feel free to use store-bought if you would like.


Here are the mini pie crusts!


And here's the apple filling.


Here are the mini-pies ready to go into the oven- butter on top!


I had some extra filling, so I stuck it in a dish and put it in the oven for baked apples!


Apple Pie
-1 or 2 pie crusts (can put one on top if you want)
-3 cups diced apples (peeled if possible)
-2/3 cup white sugar
-1 tablespoon flour
-1 teaspoon cinnamon
-2 tablespoons lemon juice
-2 tablespoons butter
Mix apples with sugar, flour, cinnamon, and lemon juice, and toss well. Put the filling in the pie crust, and dot with the butter. Bake at 400 F for about 40-50 minutes. Enjoy!


And finally, the finished pies! Please try, and enjoy!

Savor it!
love, rue

Tuesday, January 25, 2011

Homemade Pie Crust

Now, as you all have seen on this blog, there are some pretty good store-bought versions of pie crust floating around these days, and I myself can attest to their ease of use and deliciousness. However, I am also here to bear witness that making pie crust on your own is not hard- in fact, it's easy and takes under 10 minutes. So, if you've never tried it, please try to make some homemade crust- you can use it for almost anything and the sense of accomplishment is huge!

This recipe comes from the Mennonite Community Cookbook, of which I have been passed down a version. It's simple and can be turned savory or sweet, though I'm sure you all know I'm a little more inclined to the sweet! This recipe is for two 9-inch pie crusts, so that you can make a pie with crust on the top and bottom, or two open-face pies. I used one of the crusts today to make another Shoo-fly pie, and either tomorrow or the next day, I'm going to use the other one to make some delicious apple pie- I'm already excited!


Here are the simple ingredients!


Here's the crust, kneaded into a ball- don't overwork it!


The crust divided in two, ready to chill in the fridge for a little while.


And here's the finished crust in the pan! Feel free to use for whatever purpose you would like- it'll be light and crisp and buttery, so enjoy!


Pie Crust (makes 2)
-2 1/4 cup flour
-1/2 teaspoon salt
-2/3 cup butter (10 2/3 tablespoons)
-1/3 cup cold water (or more if needed)
Mix the flour and salt. Cut in the butter until the mixture resembles crumbs, but not too fine. Pour on the cold water and knead the crust together until it forms a ball. Add a little more water if you crust won't form up. Split your worked ball of crust into two, make them into balls, and chill for a few hours before using- makes it much easier to roll them out!


Savor it!
love, rue

Thursday, January 13, 2011

Hand Pies

I thought that a fitting follow-up post to Shoo-fly Pie would be hand pies, because they're what you do with the extra pie crust when you're done crafting a homemade pie. For this one, I again cheated and used a store-bought crust, which worked great. I still promise to take you through making pie crust later in the month when I make apple pie!

Hand Pies are basically bits of pie crust that you put butter and cinnamon and sugar inside of, crimp it all closed, and bake for about 15 minutes or so. They're so easy and delicious, and really very quick and easy to make. Check out my pictures:


Here are the pies rolled out and ready to be crimped closed!


Here are the pies, ready to go in the oven- aren't they the cutest?


And here are the finished hand-pies. Bake them till they start to get golden brown, and feel free to experiment with making your own crust or with different things for the filling. Enjoy!


Savor it!
love, rue

Wednesday, January 12, 2011

Shoo-fly Pie

Shoo-fly Pie is something not everyone knows about- growing up in Nashville, no one seemed to have any idea what it was except my family. And its one of our favorites! I like to think of it as a Mennonite or Pennsylvania Dutch-type coffee cake in a pie crust- less sweet and more simple and completely delicious, and even better the next day (if you can make it last that long!).

This recipe comes to me through my Grandmother Vovo, as did a million things, including my enormous sweet tooth and my love for the kitchen. This is a modified recipe from the Bucks County Cookbook (which is only available through some searching, I believe, as my mother spent a while trying to find a copy of it through the internet after we found that we had lost my grandmother's), and in our opinion, it is The recipe for Shoo-fly pie.

I might go over my Pie Crust recipe in a later post, but for this I shamelessly used a pie crust from the refrigerated section in the grocery store- they're surprisingly good and just the thing if you don't have the the time or energy for whipping up crust of your own. So for this, go ahead and make that easy step and buy one, or use your favorite recipe.
And if you've never had this pie before and it sounds totally foreign, I encourage you to give it a shot- it's really easy and delicious, and great with coffee or tea.


The crust and the two mixtures, ready to be layered.


The pie, ready to go into the oven.


And the finished pie- let cool and Enjoy!


Shoo-fly Pie
-1 piecrust
-2 cups flour
-scant 1 cup brown sugar
-2 teaspoons cinnamon
-1/2 cup butter (1 stick)
-1/2 cup boiling water
-1/2 teaspoon baking soda
-1/4 cup + 2 tablespoons molasses
Put the pie crust in the bottom of the pan.
Mix the flour, brown sugar, and cinnamon in a bowl. Cut in the butter until the mixture is crumb-like.
Mix the boiling water, baking soda, and molasses in a separate bowl.
Beginning with crumbs and ending with liquid, layer the two mixtures in the pie crust until you have used them all up (except if you think you have a little much liquid- you don't want this to be too wet).
Bake in a moderate oven for 45 minutes (the literal instructions from the book)- I usually go for about 365 F or so and make sure to bake it until there are no crumbs on a toothpick inserted in the middle.


Savor it!
love, rue